No edit summary |
m (→Legend) |
||
| Line 178: | Line 178: | ||
| style="background-color: rgb(50,205,50); width: 30px;" | || Island |
| style="background-color: rgb(50,205,50); width: 30px;" | || Island |
||
|- |
|- |
||
| − | | style="background-color:rgb(255,51,51);" width: 30px;" | || Island with |
+ | | style="background-color:rgb(255,51,51);" width: 30px;" | || Island with Natives |
|- |
|- |
||
| − | | style="background-color:rgb(64,224,208);" | || Open |
+ | | style="background-color:rgb(64,224,208);" | || Open Ocean |
|- |
|- |
||
| − | | style="background-color:rgb(212, 157, 40);" | ||Boss |
+ | | style="background-color:rgb(212, 157, 40);" | ||Boss Island |
|} |
|} |
||
|} |
|} |
||
Revision as of 18:09, 14 January 2022
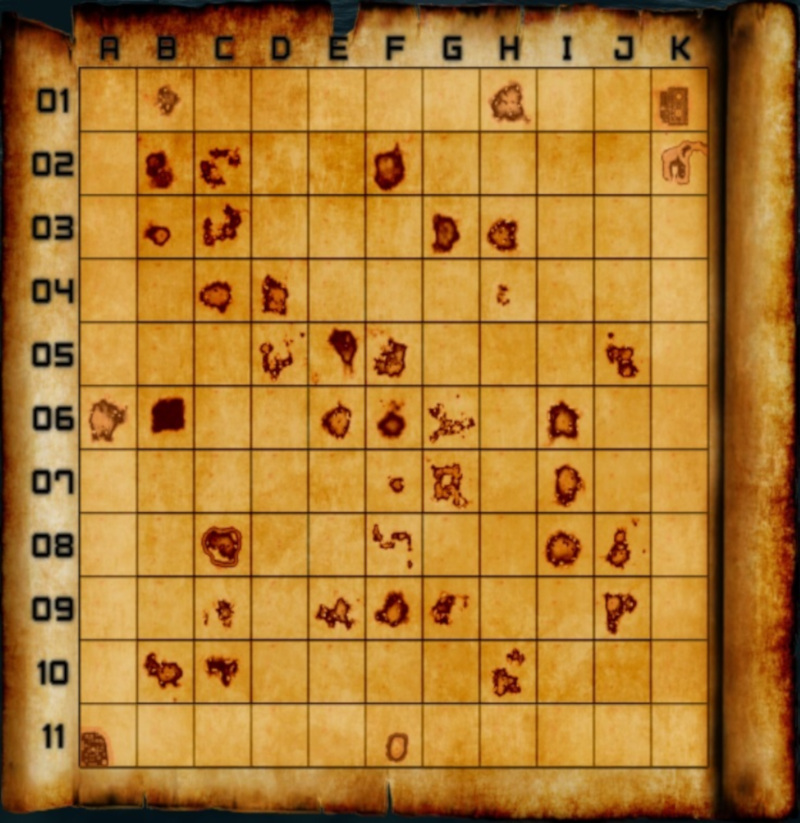
In Survival Mode, Barry begins in sector F06 on an island in the center of the World map. Physical contact with the map boundary will trigger a prompt to the adjacent map sector. There are 121 map sectors, and each sector is equivalent to 320x320 blocks.
The open ocean usually includes Sharks, so a Wooden raft or Motorboat should be used for travel
| A | B | C | D | E | F | G | H | I | J | K | |
|---|---|---|---|---|---|---|---|---|---|---|---|
| 01 | A01 | B01 | C01 | D01 | E01 | F01 | G01 | H01 | I01 | J01 | K01 |
| 02 | A02 | B02 | C02 | D02 | E02 | F02 | G02 | H02 | I02 | J02 | K02 |
| 03 | A03 | B03 | C03 | D03 | E03 | F03 | G03 | H03 | I03 | J03 | K03 |
| 04 | A04 | B04 | C04 | D04 | E04 | F04 | G04 | H04 | I04 | J04 | K04 |
| 05 | A05 | B05 | C05* | D05 | E05 | F05 | G05 | H05 | I05 | J05 | K05 |
| 06 | A06 | B06 | C06 | D06 | E06 | F06 | G06 | H06 | I06 | J06 | K06 |
| 07 | A07 | B07 | C07 | D07 | E07 | F07 | G07 | H07 | I07 | J07 | K07 |
| 08 | A08 | B08 | C08 | D08 | E08 | F08 | G08 | H08 | I08 | J08 | K08 |
| 09 | A09 | B09 | C09 | D09 | E09 | F09 | G09 | H09 | I09 | J09 | K09 |
| 10 | A10 | B10 | C10 | D10 | E10 | F10 | G10 | H10 | I10 | J10 | K10 |
| 11 | A11 | B11 | C11 | D11 | E11 | F11 | G11 | H11 | I11 | J11 | K11 |
Legend
|